What is a webserver?
A web server is software- [Program/Software: the instructions that control what a computer does; computer programs] - and hardware that uses HTTP (Hypertext Transfer Protocol) or HTTPS and other protocols to respond to client requests made over the World Wide Web. The main job of a web server is to display website content- [Contents: every content intended as text, images, audio or video] - through storing, processing and delivering webpages to users. Besides HTTP or HTTPS, web servers also support other protocols that can be called as “webservices” accessible with different ports; protocols can also be different from the http standard like FTP or SSH or other.
Web server hardware is connected to the internet and allows data to be exchanged with other connected devices, while web server software controls how a user accesses hosted files. The web server process is an example of the client/server model. All computers that host websites must have web server software.
Web servers are used in web hosting, or the hosting of data for websites and web-based applications — or web applications.
Why use Cloudflare and what is the cloudflared software?
Cloudflare is an American company that delivers services like a DNS, a content delivery network- [Network of Contents: is the channel in which owners can post their content and the audience can see the contents posted by the owners] - (CDN) and many other additional services to make websites faster and more secure. In order to understand how Cloudflare works, it is necessary to look at the frequently made mistakes that websites in the past made. When visiting a website without Cloudflare, the website visitor requests content from a server. However, when there were too many visitors on the server at the same time, the server got overloaded with the consequences of a slow or non-working website. As the owner of the website this is not something you would like to see. This is why Cloudflare invented a solution for this. Cloudflare placed their own server, in the form of an enormous worldwide network, between the website and web server. Website visitors don’t communicate directly with the server anymore, but with the Cloudflare network which already has stored the website content and loads this via a server depending on the location of the visitor. For instance: You have a website that’s hosted in Germany, and someone from the US tries to connect to your website. The request has tocover a big distance(between website and web server). Cloudflare solves this by offering a huge network of servers around the world. The American doesn’t have to make a connection with the German server anymore, but he will connect with the nearest Cloudflare server somewhere in the United States. Cloudflare Tunnels (or cloudflared software) is kind of like a VPN connection in that it’s a secure way to access- [Access the simple access to a website as a visitor] - resources on your internal private network from the outside world. The difference with Cloudflare Tunnels vs. your traditional VPN is that you don’t have to open ports in your firewall. With VPN, you connect into your VPN server (or sometimes directly to your router) through a hole that you’ve poked in your firewall. With Cloudflare Tunnels, you install a client inside your network that maintains a secure connection out to Cloudflare. You then create different FQDNs (Fully Qualified Domain Names aka. DNS names aka. CNAME records) that associate with your internal services.
How to use Cloudflared to host an application or an entire webserver
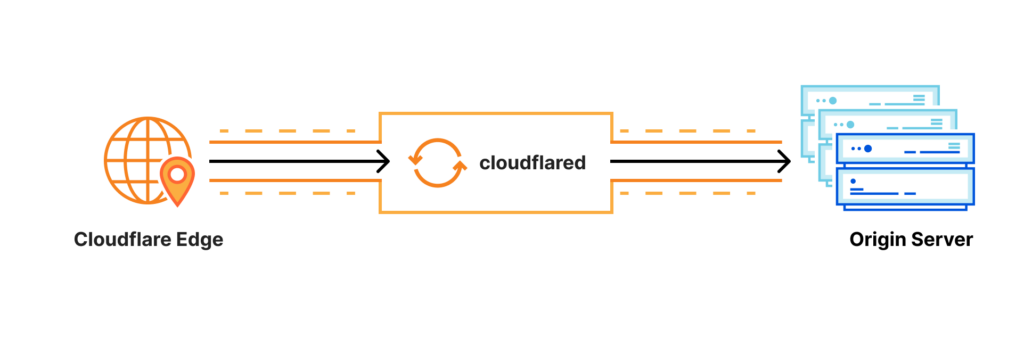
With Cloudflare you can use a small software called “cloudflared” that create a tunnel from your hardware to the cloudflare origin and link that tunnel to your port 80 or 443 of your webserver software; in this way you can also don’t open these ports to the internet and leave the firewall block them. This also increases security and allows you not to expose your IP address to the outside. To make this type of connection you need a Cloudflare account- [Account: an Account contains the personal information that is assigned to those who register and access with email and password] - and a top-level domain purchased or connected to your account. At this point to open your first tunnel you will need to access the “Zero Trust” console via the Cloudflare dashboard.
The cloudflared application than can be downloaded for every operating system here: https://developers.cloudflare.com/cloudflare-one/connections/connect-networks/downloads/
Start your secure tunnel
Once cloudflared is downloaded, you can create the first tunnel simply via terminal or by webui.
TERMINAL
Type this command to authenticate:
$ cloudflared tunnel login
Create a tunnel and give it a name:
$ cloudflared tunnel create <NAME>
From the output of the command, take note of the tunnel’s UUID and the path to your tunnel’s credentials file.
Confirm that the tunnel has been successfully created by running:
$ cloudflared tunnel list
Read the official documents to create a tunnel via terminal: https://developers.cloudflare.com/cloudflare-one/connections/connect-networks/install-and-setup/tunnel-guide/local/
WEBUI
- Log in to Zero Trust and go to Access > Tunnels.
- Select Create a tunnel.
- Enter a name for your tunnel. We suggest choosing a name that reflects the type of resources you want to connect through this tunnel (for example,
enterprise-VPC-01). - Select Save tunnel.
- Next, you will need to install
cloudflaredand run it. To do so, check that the environment under Choose an environment reflects the operating system on your machine, then copy the command in the box below and paste it into a terminal window. Run the command. - Once the command has finished running, your connector will appear in Zero Trust.
- Select Next.
Read the official documents to create a tunnel via webui: https://developers.cloudflare.com/cloudflare-one/connections/connect-networks/install-and-setup/tunnel-guide/remote/
Setup an HTTP or HTTPS connection to your webserver
Once the tunnel is created it is easy to associate a hostname to the tunnel through the “zero trust” dashboard, in the “networks” tab you can already find your tunnel registered with the “healthy” status. Now click on the tunnel name and click on the “edit” button in the “public hostname” tab click on the “add a public hostname” button; enter a subdomain to create (if you want to set up a subdomain) and select one of your primary domains, in the “type” field you can select HTTP or HTTPS (the difference between the two is in the port used and the communication protocol, we recommend using https if the server is already configured with a certificate); if you select “http” in the “url” field you will have to enter localhost:80 (or the port of your webserver or your application) instead if you select “https” in the “url” field you will have to enter localhost:443 and then expand the “additional application settings” section then “TLS” and select the “No TLS Verify” item this if your certificate used in the webserver is self-generated and therefore self-signed (this is important). To host an entire webserver, if your web server is already configured with domains that are already present in Cloudflare, you do not need to do anything else. To host a signle application you can also use custom ports for example 5000 or 8080 depending on which port the application residing on your server uses.
This way your application is now reachable via the internet through the domain you selected earlier.
Configuration recommendations
When cloudflared receives a request from a WARP device, it uses the ports on the host machine to evaluate and forward the request to your origin service. Every machine by system design is hardware-limited to a maximum 65,535 ports. Additionally, each service on the machine has a limited number of ports that it can consume. For this reason, we recommend the following deployment model:
- cloudflared should be deployed on a dedicated host machine. This model is typically appropriate, but there may be serverless or clustered workflows where a dedicated host is not possible.
- The host machine should allocate 50,000 ports to be available for use by the cloudflared service. The remaining ports are reserved for system administrative processes.
To increase the number of ports available to cloudflared on Linux:
If your machine has a /etc/sysctl.d/ directory:
Terminal window
echo 'net.ipv4.ip_local_port_range = 11000 60999' | sudo tee -a /etc/sysctl.d/99-cloudflared.conf
sudo sysctl -p /etc/sysctl.d/99-cloudflared.conf
Otherwise:
Terminal window
echo 'net.ipv4.ip_local_port_range = 11000 60999' | sudo tee -a /etc/sysctl.conf
sudo sysctl -p /etc/sysctl.conf
On Linux and macOS, ulimit settings determine the system resources available to a logged-in user. We recommend configuring the following ulimits on the cloudflared server: ≥ 70,000
To view your current ulimits, open a terminal and run:
Terminal window
ulimit -a
To set the open files ulimit:
Terminal window
ulimit -n 70000
Configuration documents from: https://developers.cloudflare.com/cloudflare-one/connections/connect-networks/deploy-tunnels/system-requirements/
General configuration documents to deploy a tunnel: https://developers.cloudflare.com/cloudflare-one/connections/connect-networks/deploy-tunnels/
Why cloudflared is recommended?
The software has various uses; we can list some of them, imagine for example being in an area of the world where there is no cable internet and to have a web server you will have to pay for very expensive satellite connections or 4g lte… Many of these connections do not have a public IP because they are napped or protected; with cloudflared it is possible to bypass these limits and still transmit on the web without exposing your IP address to the public. In the particularity of having a 4g or 5g mobile connection and being able to do it anywhere (even if the cable connection is available) we still recommend using these connections as a “backup” and not as a main connection; the reason is that if the providers see unusual traffic on the mobile network, they could also limit it. The use of cloudflared however is not limited to this; imagine for example having to create a network of servers with different functions, you could for example use a web server with a dedicated line and one (or more) home streaming servers connected via cloudflared perhaps also for a connection to databases. You may also need to have some users access your application that you normally use at an address like http://localhost:8080 with cloudflared you can do this by simply entering that port in the “host” field. It is also possible to connect multiple servers to a single domain through subdomains or set up “access” protection to protect access with two-factor authentication or user posture authentication (device used, ip, and more). In short, the uses can be various. Be careful to use it correctly, though, because Cloudflare performs periodic checks and can disable the use of accounts at any time.
Read always the official documents
As I wrote a while ago, I advise you to always read and learn from the official cloudflare documents because these software could also have changes over time. This document is written without having received any official support from cloudflare and is intended as an example for those who work in our organization.
